Posted: 02/03/2021
My OBS Configuration
Note - I don't do any streaming, neither am I a speaker at events. However I do attend a lot of online virtual events, and have multiple video calls a day, and always try to have my camera active.
Problem
My "Office" is in my bedroom, when I am on a video call, I want some of the bedroom filtered out, not everyone wants to see our dirty underwear on the floor!
Some video conferencing apps don't have a "blur background" option, and those that do tend to cause headsets and ears to appear and disappear as you move your head, which I personally find very distracting.
I want to be able to promote my contact details (Twitter) actually on my video feed.
Requirement
My single video camera feed should mask out a lot of the background view of my bedroom, focussing on the person sat in the middle of the camera view.
It should also display my name and twitter handle on the screen.
Solution
There is an awesome free bit of software out there called
OBS (Open Broadcaster Software)
which many streamers use to make there broadcasts awesome.
It allows you to create a "Virtual Camera", and do lots of cool things with it. Add overlays, insert pictures, videos the list is huge.
This sounds like you need some expensive hardware/software to pull off. I can assure you that is not the case. The better PC you have, the more you can do with OBS, but even for just a "work call", you can make your video feed better.
Now I won't go into how to use OBS, there are so many good guides on the web already, specifically there own guides, so if you are new to OBS, read some of these first.
Hardware Configuration
I have a single HD webcam with an inbuilt Microphone.
I also use a very cheap headset.
Total cost of these 2 things £25 from ebay.
OBS Configuration
Startup
- Virtual camera turned on at startup.
- "Studio mode" enabled on startup:
"C:\Program Files\obs-studio\bin\64bit\obs64.exe" --startvirtualcam --studio-mode
Scenes
I have 4 scenes:
- Normal Camera
- Just head
- Captions
- Screen Share
Each scene is based on the previous to build into a final view.
"Normal Camera" scene
This is a scene with the web cam and the audio settings to be used.
No changes of the video inputs.
My audio input has a
Noise Suppression filter
So its just a scene with 2 sources:
- Video Capture Device
- Audio Input Capture
"Just head" scene
This scene is to try and make the view focus on "just my head". Im not going to crop the feed to just be that space. I want to give the viewer the sense of the place I am in, but not allow them to see the detail.
To achieve this, the scene has the previous "Normal Camera" scene as the only source.
The reason to do that is I can now manipulate what the "camera" looks like by overlaying things on top without adjusting the actual video feed. This means I can use the original feed in any scene I like and adjust it how I feel. e.g. One scene can have it cropped to just my head, another can colour it blue.
Then a filter is applied to the SCENE, NOT the "Normal Camera" source.
The filter is "Image Mask/Blend".
This filter will allow us to setup a blur type affect for most of the camera view. Leaving a very clear view in the middle (where I am on the screen).
I got the idea from this post
I use a round image with a solid middle, and fading out to a transparent rectangle. e.g.

I achieved this using paint.net:
- Create a 480x320 image.
- Select everything, and delete it which will make it transparent.
- Then set the primary brush colour as #29FD2E
- Use a big paint brush about 2/3 of the image size, drop a non opaque circle in the middle.
- Then create a brush that is 3 times bigger than the image with a reduced hardness, and paint in the middle again.
- You will need to play with this to achieve the blur you like in the view. This is a bit of trial and error, and depends on how much you want to blur out on the screen.
Once you have your image saved, using the "Image Mask/Blend" filter on the "Just Head" scene, add the path to the image, change the "Type" to "Alpha Mask (Alpha Channel)"
This should then give you your camera view with a partially blurred background with a centre "Spot light" for you to be within.
Now you have the basic framing for your camera, you can add additional features, such as screen captions...
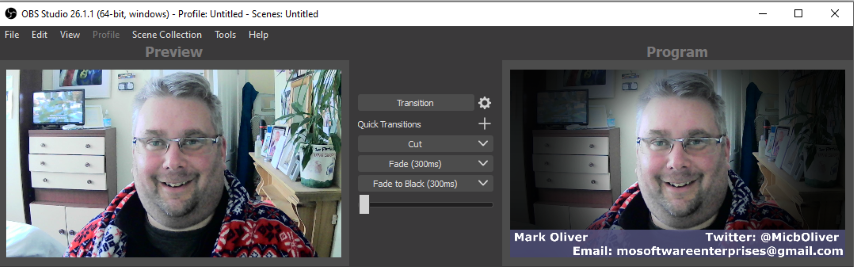
"Captions" scene
This has 2 sources:
- "Just Head" scene from above
- Text (GDI+)
The text element has my name, twitter handle and email address on a grey blue background with a bit of opacity, and a nice clear font.
This is then placed at the bottom of my scene.
That's all folks
So using 3 scenes, I go from a full view of my bedroom to anyone looking at my camera, to a view focussed on my head, with my contact details displayed on the screen.
Before on the left, After on the right:
But wait, you said there are 4 scenes, what happened to the screen share scene...
"Screen Share" scene
This is a scene with the "Captions" scene as a source, which is shrunk to the bottom right hand corner.
Then a new source is added called "Screen Capture", which is aimed at one of my displays to show what is on the screen in my video feed.
This allows me to "screen share" while also being on screen still. This gives anyone I am talking to a more personal screen share. (Excellent Pair programming option)
Thanks for reading this post.
If you want to reach out, catch me on Twitter!
I am always open to mentoring people, so get in touch.